Creating a Custom Metric to Check SAPRouter SNC Certificate Expiry

This metric and script checks the SAPRouter SNC certificate expiry and gives an alert depending on how many days left until expiry.

Define SAProuter in Focused Run LMDB

Prerequisite: Make sure you have installed the SAP Host Agent and performed Outside Discovery on the SAPRouter host.

Go to the LMDB of you Focused Run system, then go to Single Customer Network:

Switch Namespace and go to “Technical Systems” and choose “Unspecific Standalone Application System” from the drop-down, then hit Create.

Enter:

Enter the Extended SID:

Add Software Component Version:

Search on the software, and then select the correct release, then Add. E.g.:

Save

Add Installation Path and Required LMDB Attributes. NOTE: Find out the relevant software installation path of the SAPRouter on the server.

Perform Simple System Integration

Configure Script and Custom SAPHostCtrl Operation

Prerequisite: The script requires the SAPRouter SNC Certificate to be properly installed, and the PSE credentials in the cred_v2 file for the account that runs the SAPRouter service.

A script is scheduled to run daily as the same user that runs the SAPRouter service. The script reads the expiry date of the from the PSE and writes it to a file in JSON format so that the FRUN metric can read and interpret it. The script by default has SAPRouter home directory as /usr/sap/saprouter or <drive>:\usr\sap\saprouter, and it can be changed. This will be denoted as <SAPROUTER_HOME>. The PSE file variable can also be changed.

Linux/Unix

Create a new executable file in the SAPRouter home directory and copy the code in Appendix A. Ensure it is owned and executable by the user that runs the SAPRouter service and belongs to group sapsys. E.g.,

chown <saprouter user>:sapsys saprouter_expiry_days.sh
chmod 744 saprouter_expiry_days.sh

In the script, adjust the following variables:

  • SAPROUTER_HOME
  • SECUDIR (The SECUDIR folder is where the PSE file resides)
  • SAPROUTER_USER
  • PSE

Test the Script. Switch to the user that runs the SAPRouter service, then execute the script:

/usr/sap/saprouter/saprouter_expiry_days.sh

Look for file NUMDAYS.json. It should contain e.g.:

{type:integer, name:NumDays, value:136}

Schedule script in the root crontab as follows:

# Run SAProuter SNC Certificate expiry check
00 09 * * * su - <saprouter user> -c /usr/sap/saprouter/saprouter_expiry_days.sh

Windows

Create a batch file (*.bat) in the SAPRouter home directory. In the script, adjust the following variables:

  • SAPROUTER_HOME
  • SECUDIR (The SECUDIR folder is where the PSE file resides)
  • PSE

Test the Script. Logon as the user that runs the SAPRouter service. Right-click on the bat script and “run as Administrator”. Alternatively, if you are not logged as the SAPRouter service account, you can “run-as” the user that runs the SAPRouter service and execute the script that way.

runas /user:<domain or hostname>\<SAPRouter service user> <SAPROUTER_HOME>\saprouter_expiry_days.bat

NOTE: The SAPRouter service user requires “Allow log on locally” user rights.

Look for file NUMDAYS.json. It should contain e.g.:

{type:integer, name:NumDays, value:136}

Schedule the Script. Open a command prompt as administrator. Execute the command:

SCHTASKS /CREATE /RU <DOMAIN>\<saprouter user> /RP <password> /SC DAILY /TN "Run SAPRouter SNC Certificate expiry check" /TR "C:\Windows\System32\cmd.exe /C \"<SAPROUTER_HOME>\saprouter_expiry_days.bat\"" /ST 09:00 /RL HIGHEST

Note: The start time e.g., 09:00 is in 24 hour format. You should see:

Run the new task to test it:

SCHTASKS /RUN /TN "Run SAPRouter SNC Certificate expiry check"

You should see:

Check the timestamp of the file NUMDAYS.json.

Create Custom Operation for saphostctrl

To load these values into Focused Run, a custom operation for saphostctrl needs to be created.

Linux/Unix

As Root: Create the following custom operations conf file:

/usr/sap/hostctrl/exe/operations.d/checksnccert.conf

Enter the following into the conf file:

Command: cat /usr/sap/saprouter/NUMDAYS.json
Description: Check number of days to SNC certificate expiry
ResultConverter: flat
Platform: Unix

Test the custom operation as follows:

/usr/sap/hostctrl/exe/saphostctrl -function ExecuteOperation -name checksnccert

Result should be:

Webmethod returned successfully
Operation ID: 06C635D6863A1EEDB6BC5C819EE199D7

----- Response data ----
description=Check number of days to SNC certificate expiry
{type:integer, name:NumDays, value:169}
exitcode=0

Windows

Create the following custom operations conf file:

C:\Program Files\SAP\hostctrl\exe\operations.d\checksnccert.conf

Enter the following into the conf file:

Command: FOR /F "tokens=* delims=" %x in (<SAPROUTER_HOME>\NUMDAYS.json) DO @echo %x
Description: Check number of days to SNC certificate expiry
ResultConverter: flat
Platform: Windows

In a Command Prompt as Administrator, test the custom operation as follows:

"C:\Program Files\SAP\hostctrl\exe\saphostctrl" -function ExecuteOperation -name checksnccert

Result should be:

Webmethod returned successfully
Operation ID: 00155D657F901EEDBCF9E32BC564F964

----- Response data ----
description=Check number of days to SNC certificate expiry
{type:integer, name:NumDays, value:360}
exitcode=0

Create Custom Alert in Focused Run

Create a new monitoring template for SAPRouter here:

Enter into Expert Mode. Create a new Alert with the following settings:

NOTE: If the tick box “Do not Group Individual Occurrences” is ticked, it will alert at each data collection regardless of its previous rating, and not only at a change of rating.

Create Custom Metric In Focused Run

Create a new Metric with the following settings:

Data Collection

All parameters of the Data Collector which are fixed should have the “Configure” box unticked, and the common parameters pre-filled with the correct values.

The “Custom Operation” parameter is the saphostctrl operation “checksnccert” created earlier. The “Metric Name” parameter is the name of the metric in the JSON output file produced by the script, which is “NumDays”.

Usage

Threshold

The threshold picks up the integer as returned by the script; if it falls to below or equals 10 days, then raise a yellow alert, if below or equals 5 days, then raise a red alert. Choose whatever threshold values suit you.

Assignment

Assign the Metric to the Alert:

Activate the Alert

Apply SAPRouter Template and Check Monitoring

TIP: Initially set the collection interval to 5 minutes and apply template to see whether it is collecting data. Then you can set the collection interval back to daily.

You should see this in the Monitoring Application:

Appendix A: saprouter_expiry_days.sh

#!/bin/bash
# Outputs the expiry date of the SNC Certificate and calculates the number of days
# If the number of days falls below threshold, it sends an alert
# Written by Tony Swietochowski

SAPROUTER_USER=saprouter
SAPROUTER_HOME=/usr/sap/saprouter
SECUDIR=$SAPROUTER_HOME/sec
PSE=local.pse
HOSTNAME=$(hostname -f)

# Check  for saprouter user
[[ ! "$USER"=="$SAPROUTER_USER" ]] && echo "This script must be run using the $SAPROUTER_USER user. Exiting." && exit 1

EXPIRYDATE=$(${SAPROUTER_HOME}/sapgenpse get_my_name -p $PSE -n validity 2>&1 | grep NotAfter | awk -F\( '{print$2}' | cut -c -6)
NUMDAYS=$(echo $(( ($(echo $(date --date="$EXPIRYDATE" +%s) - $(date -d $(date +%y%m%d) +%s)) )/86400 )))
# Above method based on https://stackoverflow.com/questions/4946785/how-to-find-the-difference-in-days-between-two-dates

echo $NUMDAYS > $SAPROUTER_HOME/NUMDAYS
echo \{type:integer, name:NumDays, value:$NUMDAYS\} > $SAPROUTER_HOME/NUMDAYS.json

Appendix B: saprouter_expiry_days.bat

@echo off

REM Outputs the expiry date of the SNC Certificate and calculates the number of days
REM If the number of days falls below threshold, it sends an alert
REM Written by Tony Swietochowski

set SAPROUTER_HOME=D:\usr\sap\saprouter
set SECUDIR=%SAPROUTER_HOME%\sec
set SNC_LIB=%SECUDIR%\sapcrypto.dll
set PSE=local.pse

for /f "tokens=2 delims=\" %%i in ('whoami') do set THISUSER=%%i
FOR /F "tokens=* USEBACKQ" %%F IN (`hostname`) DO (SET HOSTNAME=%%F)

chdir /d %SAPROUTER_HOME%

for /f "tokens=2 delims=(" %%a in ('%SAPROUTER_HOME%\sapgenpse.exe get_my_name -p %PSE% -n validity ^2^>^&^1 ^| findstr /l "NotAfter"') do set DATESTRING=(%%a

set expiry_year=20%DATESTRING:~1,2%
set expiry_month=%DATESTRING:~3,2%
set expiry_day=%DATESTRING:~5,2%

set current_year=%date:~-4%
set current_month=%date:~4,2%
set current_day=%date:~7,2%

set "from=%current_month%-%current_day%-%current_year%"
set "to=%expiry_month%-%expiry_day%-%expiry_year%"
echo Wscript.Echo DateDiff("d", "%from%", "%to%") > %TEMP%\tmp.vbs

for /f %%a in ('cscript /nologo %TEMP%\tmp.vbs') do set /a "numdays=%%a"

del %TEMP%\tmp.vbs

echo Number of days to SAPRouter certificate expiry: %numdays% > %SAPROUTER_HOME%\NUMDAYS.log
echo {type:integer, name:NumDays, value:%numdays%} > %SAPROUTER_HOME%\NUMDAYS.json
SAP Focused Run Rule Based Template Assignment…

Introduction

When we perform Simple System Integration (SSI) on a managed system , it automatically activates the SAP default monitoring template on the managed system. However, in most of the SAP Focused Run (FRUN) implementation scenarios, we create customer defined monitoring templates (Custom Templates), which we then manually assign/activate on the managed system.

Rule Based Template Assignment is a feature in FRUN by which we can define based on managed system category which custom monitoring template to be assigned and activated directly when we perform SSI on the managed system.

Defining Rule Based Template Assignment

For Rule Based Template Assignment navigate to the FIORI tile Individual Maintenance in the Advanced System Management section of FIORI launch-pad.

In the Individual Maintenance App navigate to the Rule Maintenance by clicking on the button as shown below.

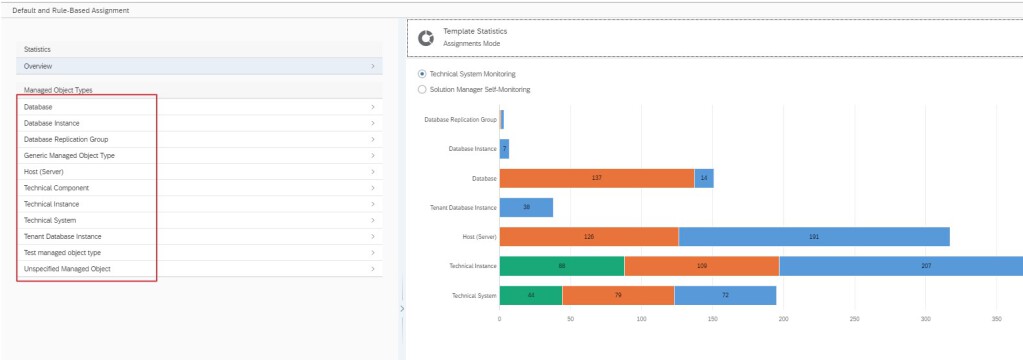
In the Rule Rule Based Assignment Screen, on the left hand side panel, select the specific Managed Object type for which you want to define the Rule Based Template Assignment.

In this blog we take the example of defining a Rule Based Template Assignment for managed system of type SAP ABAP BASIS 7.10 and higher and specify the custom template for System Level monitoring template. So we select Technical Systems upon which the right side panel now gives a list of all product types. In the right side panel we scroll down and select SAP ABAP BASIS 7.10 and higher.

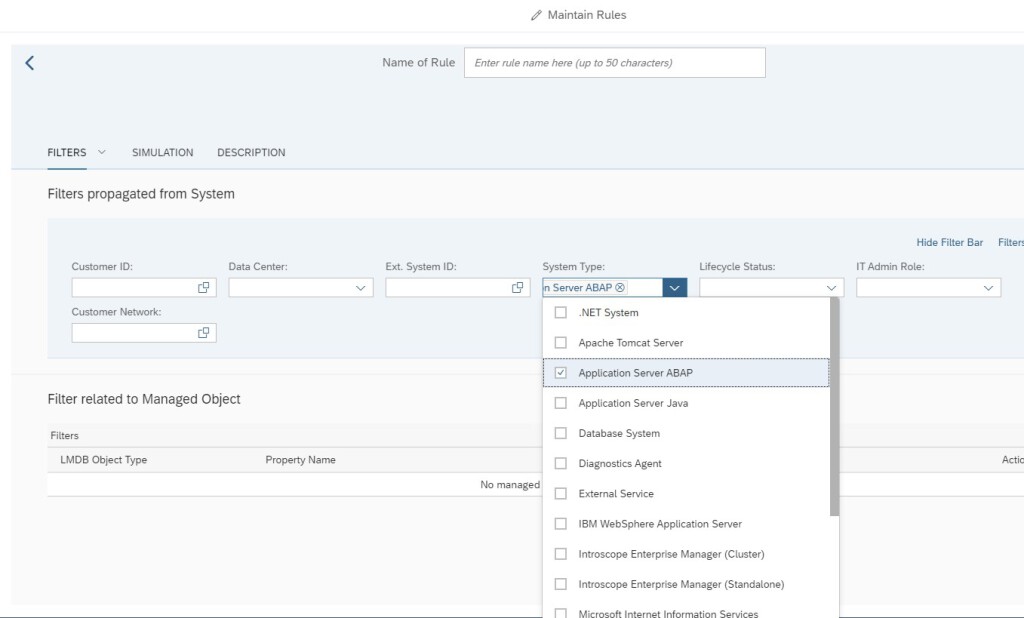
Now we need to define the Rule based on which the Custom Defined Template to be defined. In this blog we take the example that we have defined 2 custom templates one for Production Systems and one for Non Production Systems. So we will need to define rule to assign template based on filters System Type ABAP and IT Admin role defined in LMDB. For more information on this function read this blog.

In the subsequent screen select Maintain Rules.

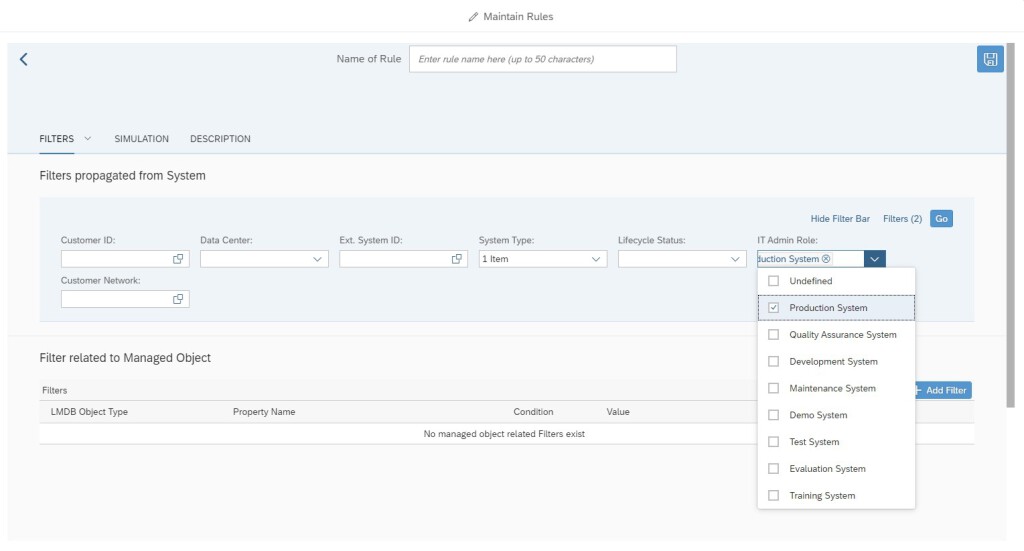
In the Maintain Rule screen we select the following filters.

Name your Rule and Save.

Similarly you can create Rule ABAP Non production, just ensure to select the following IT Admin Roles.

Now back in the main screen select the Rule you created from the drop down.

And for Template select the custom template you want to select for the assignment.

Add the assignment.

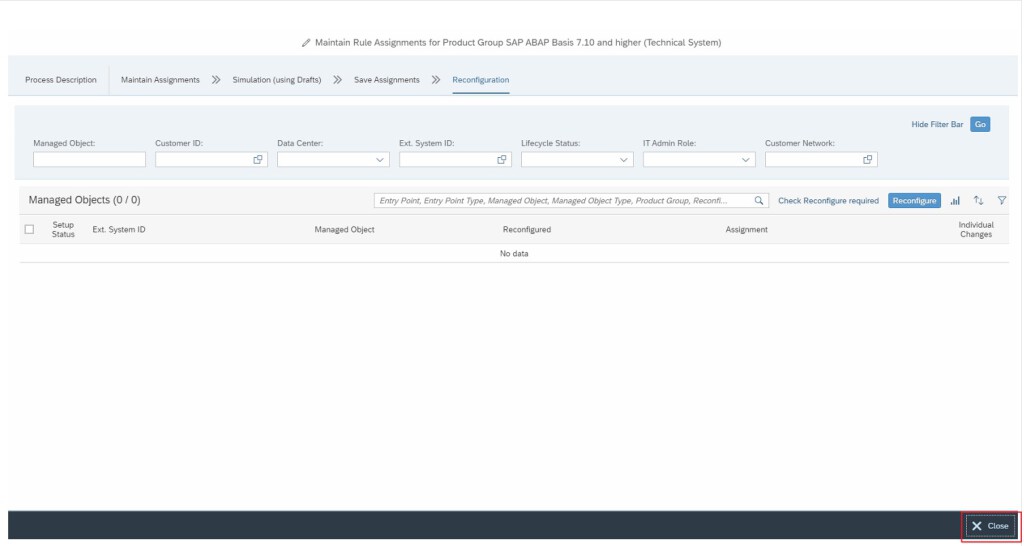
Now click in Continue with Next Step button till you come to the Reconfiguration tab and then close. This will allow you to save your Rule Assignment.
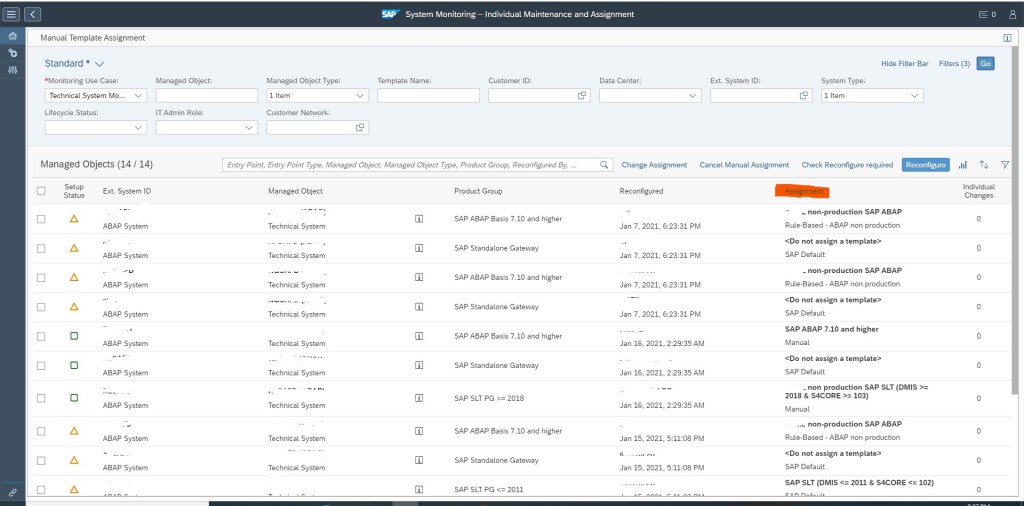
Once you have assigned the ABAP Production and ABAP Non production rules in the main screen you will see the following assignments listed.

After the assignments done, the next time SSI performed on any ABAP system will take up the custom monitoring template as defined in these rules.

In Individual Maintenance system list you can also see whether current assignment is SAP default or Rule Based Template Assignment.

Create custom metric for system monitoring…

In some cases you want to have your own metric defined to fine tuning the system monitoring template.

Questions that will be answered in this blog are:

  • How do I create a custom monitoring metric?
  • Do I need to re-create the custom metric per monitoring template?
  • What are examples of custom metrics?

Creating custom metric

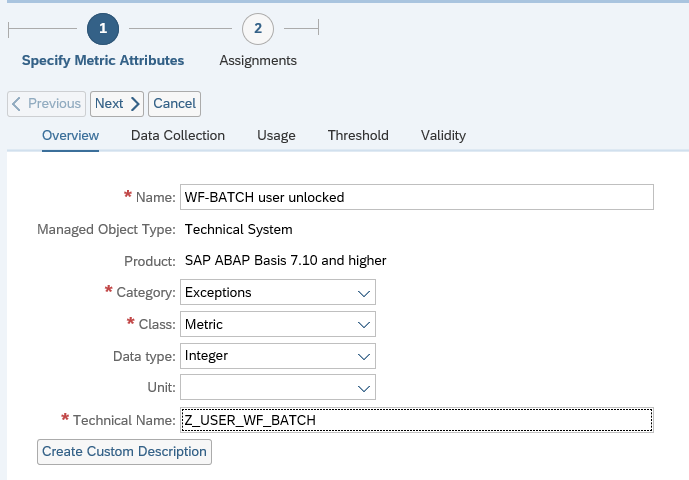
In this example we create a custom metric to make sure that the user WF-BATCH is not locked.

There is already a metric in the ABAP template that is called User Lock Status. This can be used as a basis for our custom metric.

Goto your template into change mode and on top left choose Create (you need to be in Expert mode first):

And select Metric. Now the screen opens for a new metric creation:

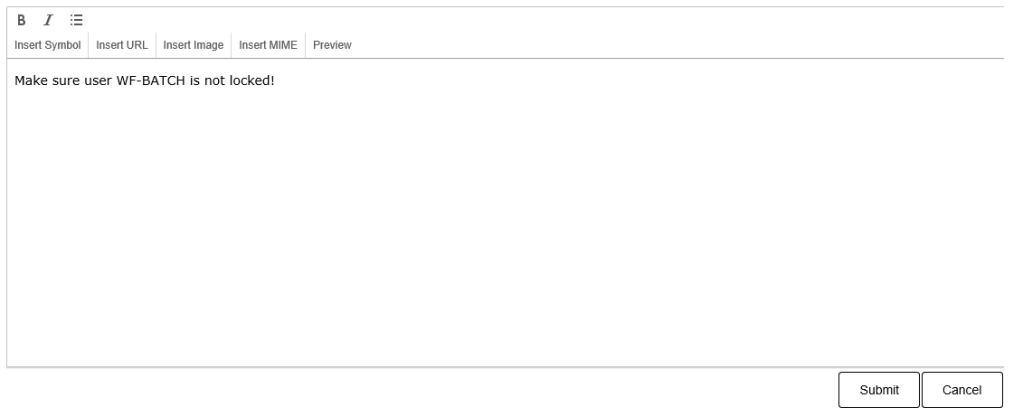
Fill out the details, and create a custom description:

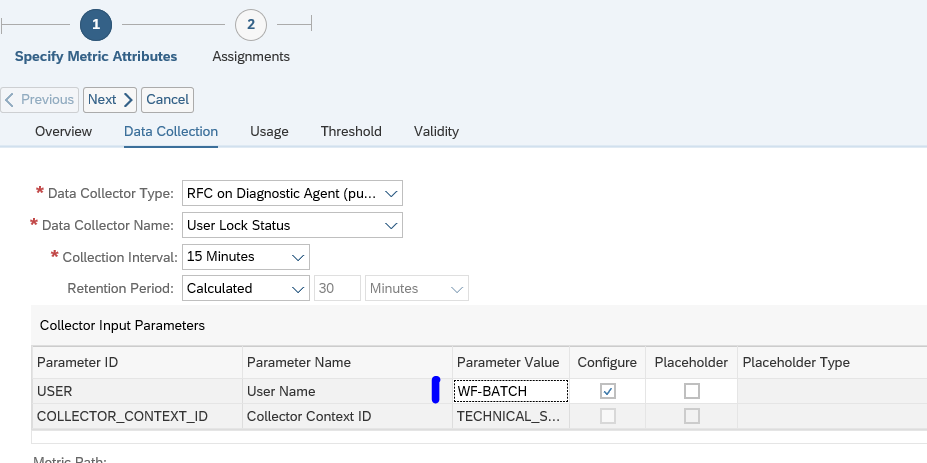
Now go to the tab Data Collection:

Copy the data from your reference metric here. Don’t forget to fill out the Parameter Value. In this case WF-BATCH. Also make sure you have a reasonable Collection Interval timing. Not everything is need to be collected every 5 minutes.

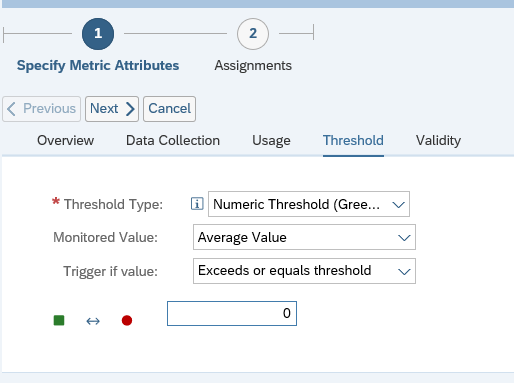
Now go to the tab Threshold:

Configure your threshold setting.

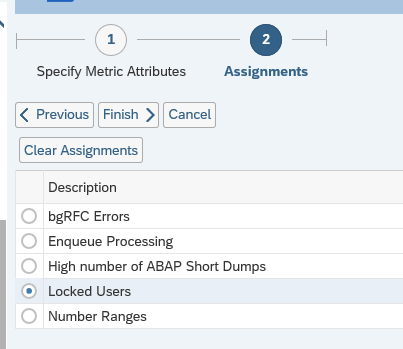
Now press the Next button and assign the metric to the correct group:

Now press Finish to save the metric.

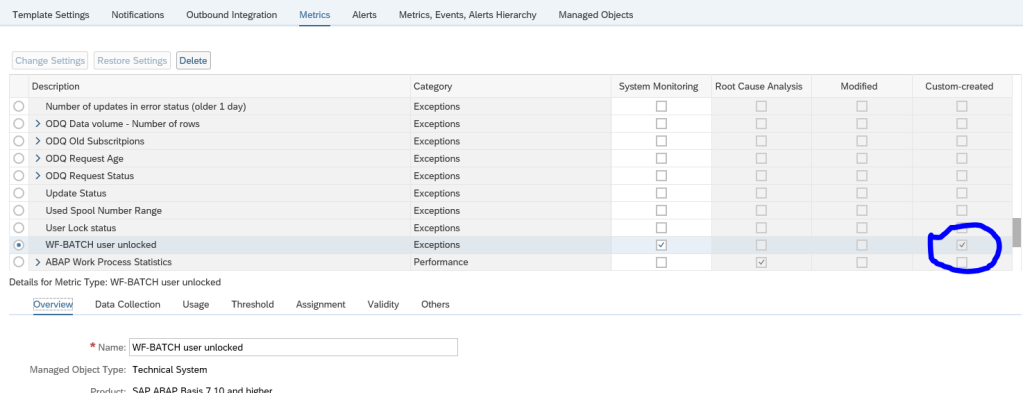
The new custom metric is now available in the monitoring template:

You see that this one has the Custom created marked. Later you can use the filter on Custom created column to quickly find it again.

Deploying custom metric to other templates

If you have to deploy the custom metric to other templates: so far this is a manual action. Per template you have to re-create the same custom metric. I have not found a nice way of re-using custom metrics yet.

Examples of custom metrics

Examples of custom metrics:

Fine tuning monitoring templates…

This blog explains about fine tuning of the monitoring templates.

Questions that will be answered are:

  • How to update the SAP content for templates?
  • What is a good rule of thumb for the amount of templates to create and maintain?
  • Should I transport the templates or maintain them locally?
  • How to create your own template?
  • How to fine tune a single metric?
  • How to change the alerting settings of a metric?
  • How to assign the template to a system?
  • How to update the template of a system?

SAP content updates

As a starting point you use the SAP pre-delivered content. Also the SAP content gets updated. OSS note 2695734 – Manual Content Update for FRUNCONT200 in Focused Run 2.0 for SAP Solution Manager (FRUN-CONT) is keeping track of the updates. It also explains where to download the content files. For version 3.0 take OSS note 2991255 – Manual content update for FRUN-CONT 300 in SAP Focused Run (FRUN-CONT). And for 4.0 OSS note 3275006 – Manual content update for FRUN-CONT 400 in SAP Focused Run.

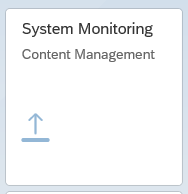
Use program RCSU_MANUAL_UPLOAD to upload the downloaded content. Then use the FIORI tile Content management to activate the new content:

And update the content or see it is already up-to-date:

Before you start fine tuning your own templates, make sure the standard SAP content is up-to-date.

Amount of templates to fine tune

In principle it is up to you to generate as much templates as needed. Initially it seems a good idea to have many different templates. The setback is that fine tuning a specific metric that is valid for all templates, you need to repeat this action. Also when you have fine tuned a template, you need to update the attached systems.

A good starting point for fine tuning is to have 2 templates to start with:

  1. Template for productive system
  2. Template for non-productive system

The template for productive system can have more metrics activated with sharper thresholds for generating alerts.

The main goal for a non-productive template can be focused on system availability only.

For productive system you want to manage all aspects of a system including performance and all content exceptions.

Local maintenance or transport

The template maintenance can be done on a productive Focused Run system directly. Or you can choose to maintain the templates on a trial/test Focused Run system, test it there, and then transport it to the productive Focused Run system. The transport is the best approach that gives the most control.

Who should fine tune a template?

This is an organisational question. If you let everybody maintain the templates and metric content of the templates, you will quickly loose control. Best to limit the amount of people to maintain the template settings. Be careful when handing out template control to a service provider. They tend to change the thresholds to very high levels, so they get less alerts. In stead of solving the alerts….

Creation of own template

Open the template maintenance FIORI tile:

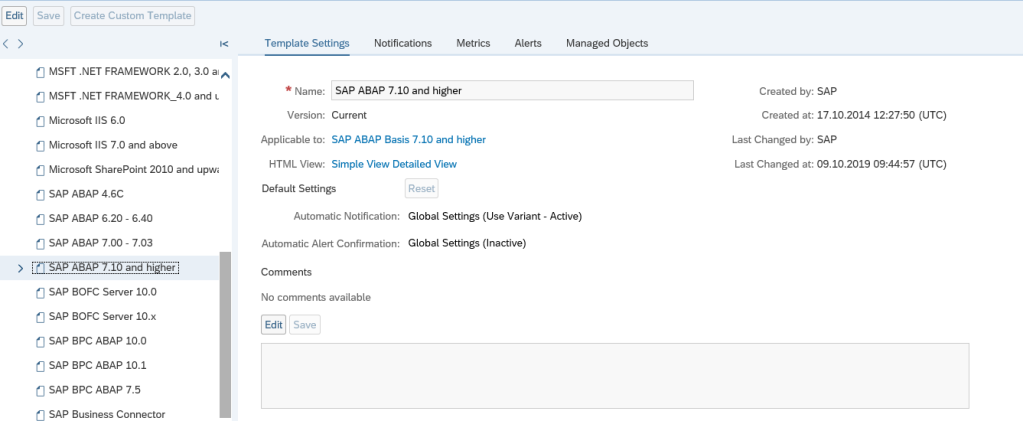
Select the template you want to fine tune. In this example we will fine tune the Technical System template for ABAP 7.10 and higher:

Press the Edit button and then the button Create Custom Template:

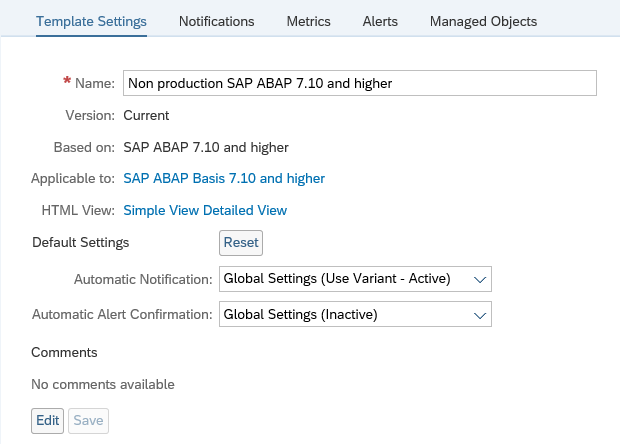
Give the template a good name. The most descriptive text must be at the beginning.

Fine tuning the template

Case 1: include or exclude in monitoring

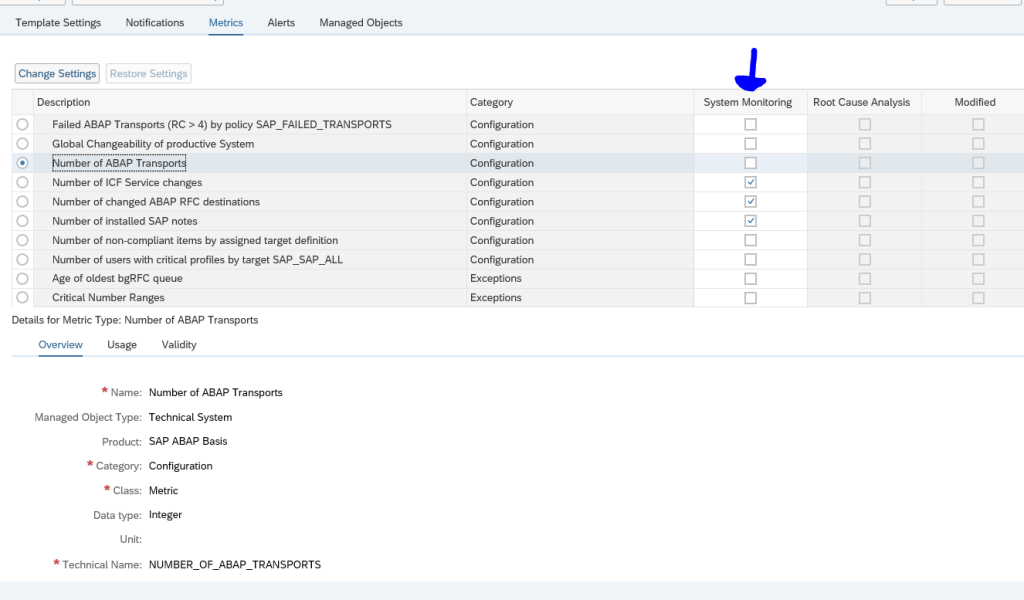
Goto the metrics tab:

In the system monitoring you can switch on or off metrics. Press save after each change to save your setting changes.

Case 2: fine tune data selection

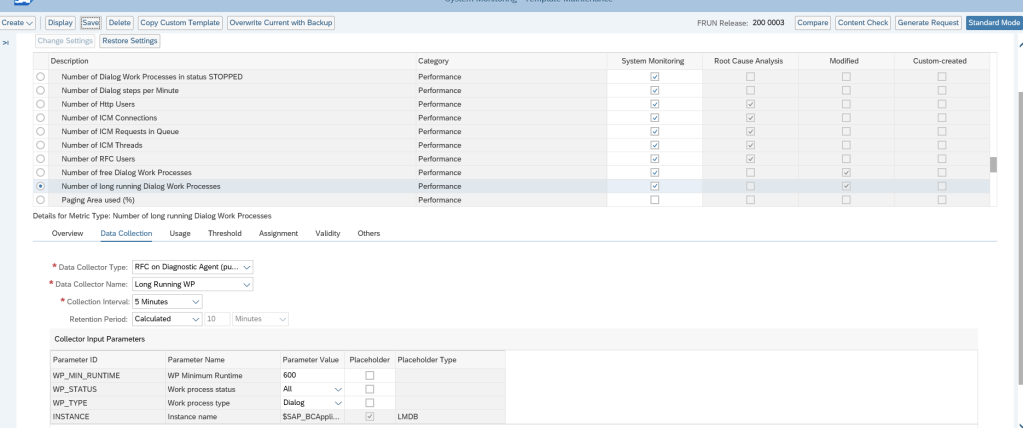
In the standard SAP delivery there is an alert for Number of long running Dialog Work Processes. Goto the Expert mode (button top rights), then select the tab data collection:

Go into edit mode via the Change Settings button, and you can update the field value in parameter value for WP_MIN_RUNTIME to your needs.

This is just an example. You can fine tune a lot of metrics in this way.

Case 3: fine tune threshold and alert settings

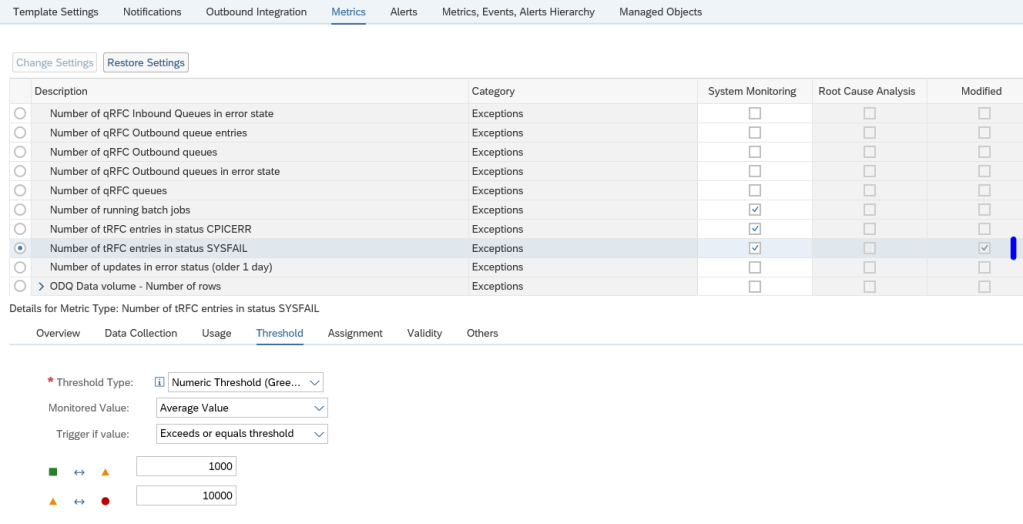
If you want to change the thresholds, first click on the expert mode button on the top right corner. Then press the Change setting button to edit the Threshold tab settings:

In this example we changed the type from Numeric (green/red) to Numeric (green/yellow/red) and we changed the values. The modified column indicates that we have changed a metric and that the definition is different from the standard SAP one.

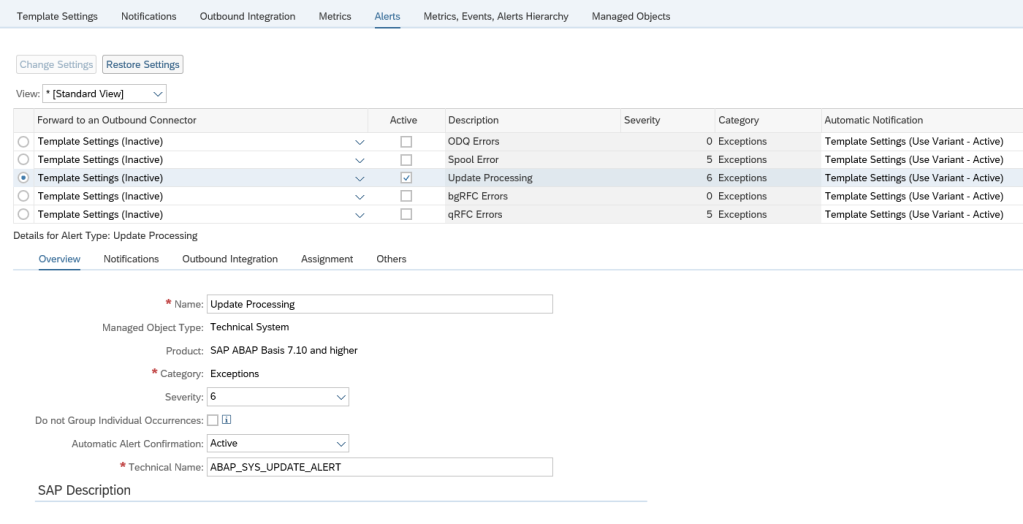
On the Alerts tab you can make changes to the alert settings:

You can change the following:

  • If an alert is to be generated or not (Active means, alert is generated)
  • Severity of the alert
  • If an alert will be automatically confirmed when the system detects that the issue is solved
  • If an automatic notification will be send or not (see this blog to set up mail notification)

The usage of alerts, will be explained in this blog.

The configuration of automatic notifications is explained in this blog.

In the last tab Managed Objects you can see there are no systems assigned yet to the newly created template.

Assigning custom template to a system

To assign a new custom template to a system, goto the Individual maintenance FIORI tile:

Select the system and press the button Change assignment and assign the wanted new template:

Now press the button Reconfigure to effectuate the template change.

Automation of template assignments can be configured as well by using rules. This is explained in this blog.

Template updates

If you have systems assigned to a template, and you have executed template changes, goto the tab Managed objects in the template maintenance screen:

Select the systems and press the Apply and Activate button. The system will apply the updated template now.

If you use transport mechanism for template updates: after transport import, you need to go to the updated templates, and still to the update assignment. This is not automatically done after the transport.

Compare templates

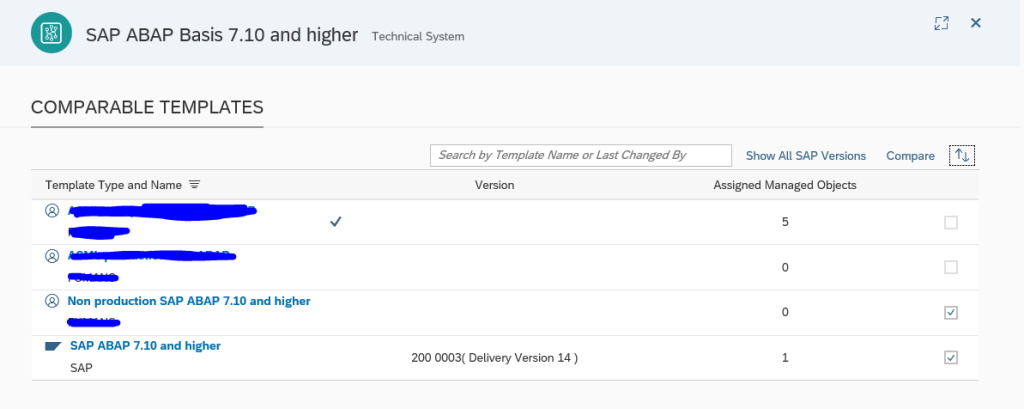
In the main screen of template maintenance you can select the button Compare to start the template comparison app. Select the templates to compare:

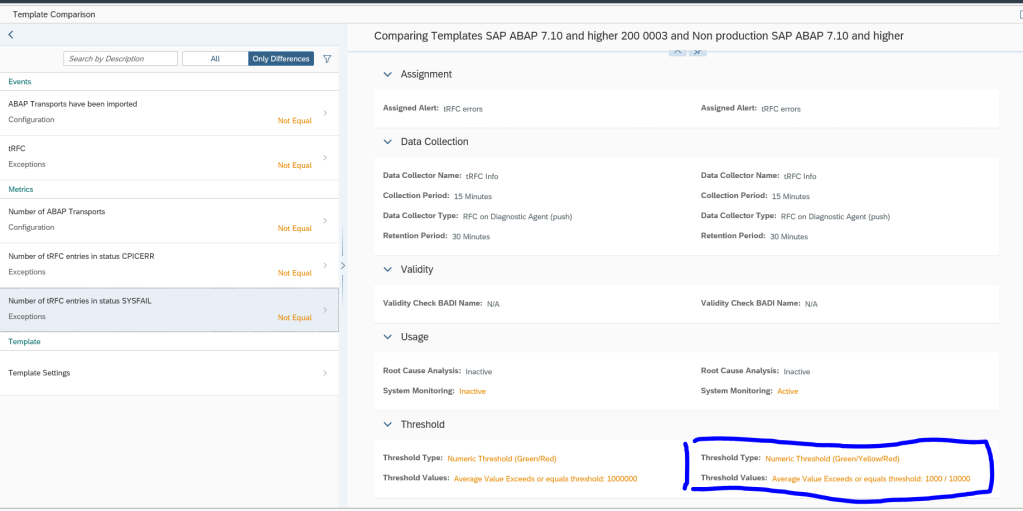
You now see the delta’s between the templates:

Creating custom metrics

Creation of custom metrics is possible. Read more about it in this blog.

The setback of custom metric is that it needs to be created each time for each template. This is another reason to keep the amount of custom templates as low as possible.