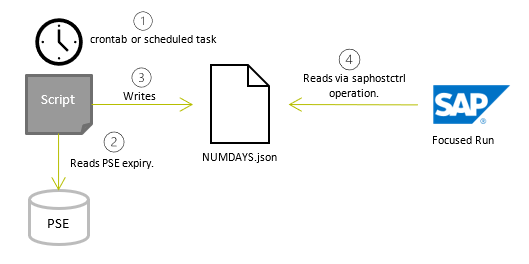
This metric and script checks the SAPRouter SNC certificate expiry and gives an alert depending on how many days left until expiry.
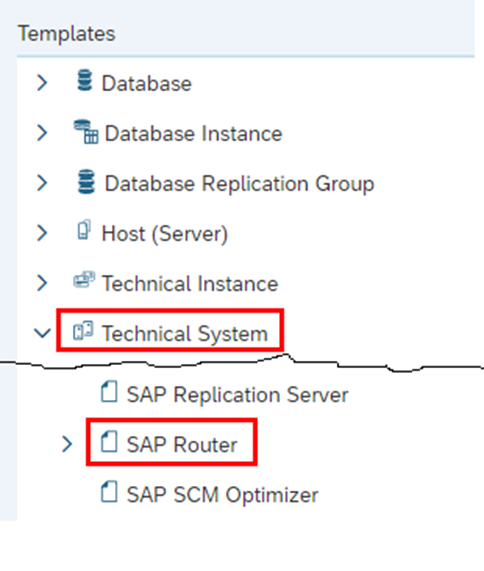
Define SAProuter in Focused Run LMDB
Prerequisite: Make sure you have installed the SAP Host Agent and performed Outside Discovery on the SAPRouter host.
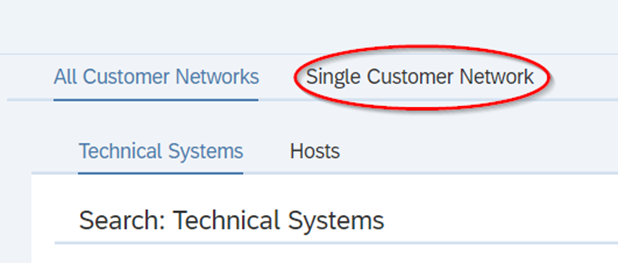
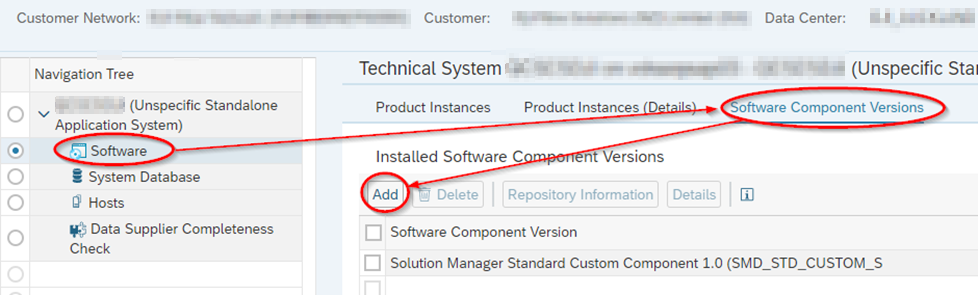
Go to the LMDB of you Focused Run system, then go to Single Customer Network:
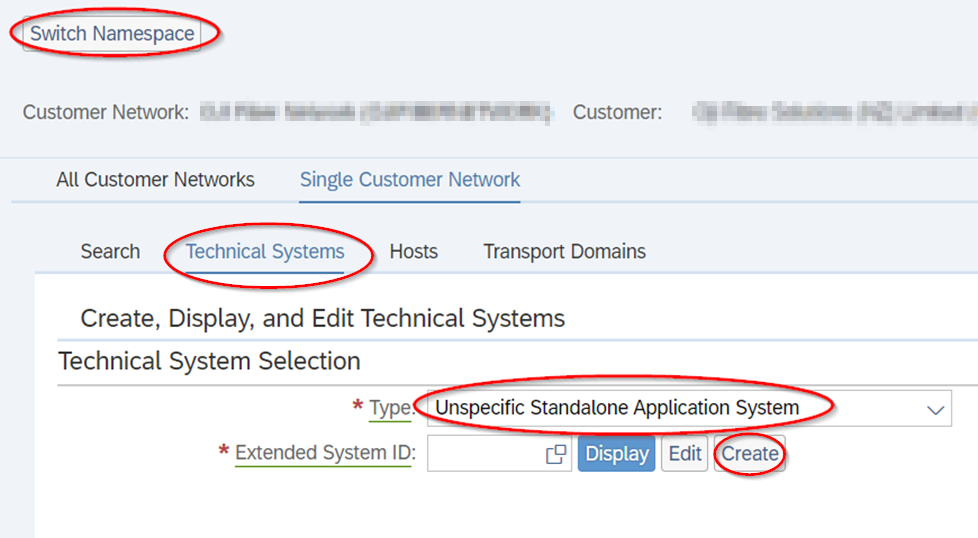
Switch Namespace and go to “Technical Systems” and choose “Unspecific Standalone Application System” from the drop-down, then hit Create.
Enter:

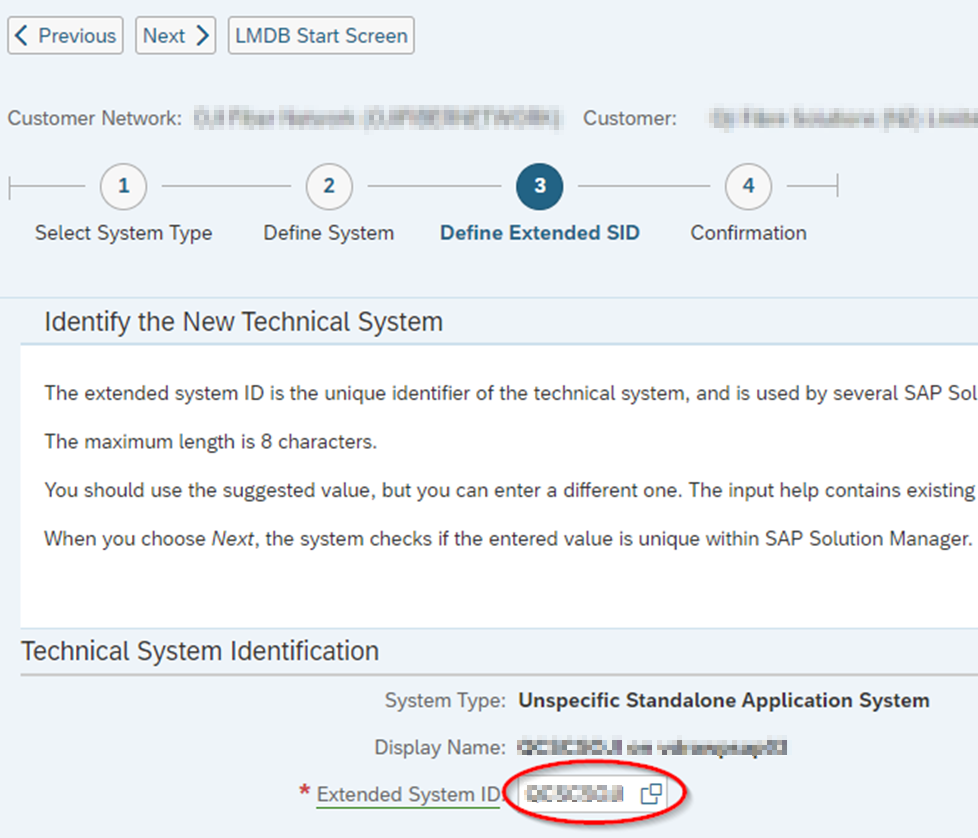
Enter the Extended SID:
Add Software Component Version:
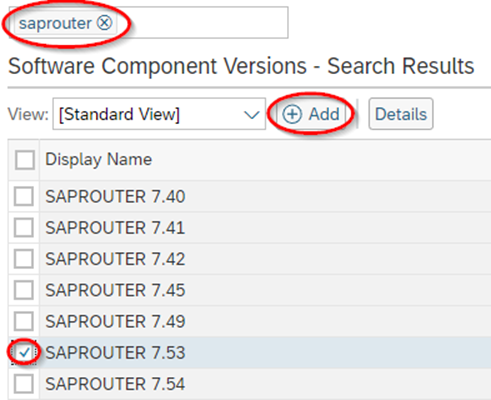
Search on the software, and then select the correct release, then Add. E.g.:
Save
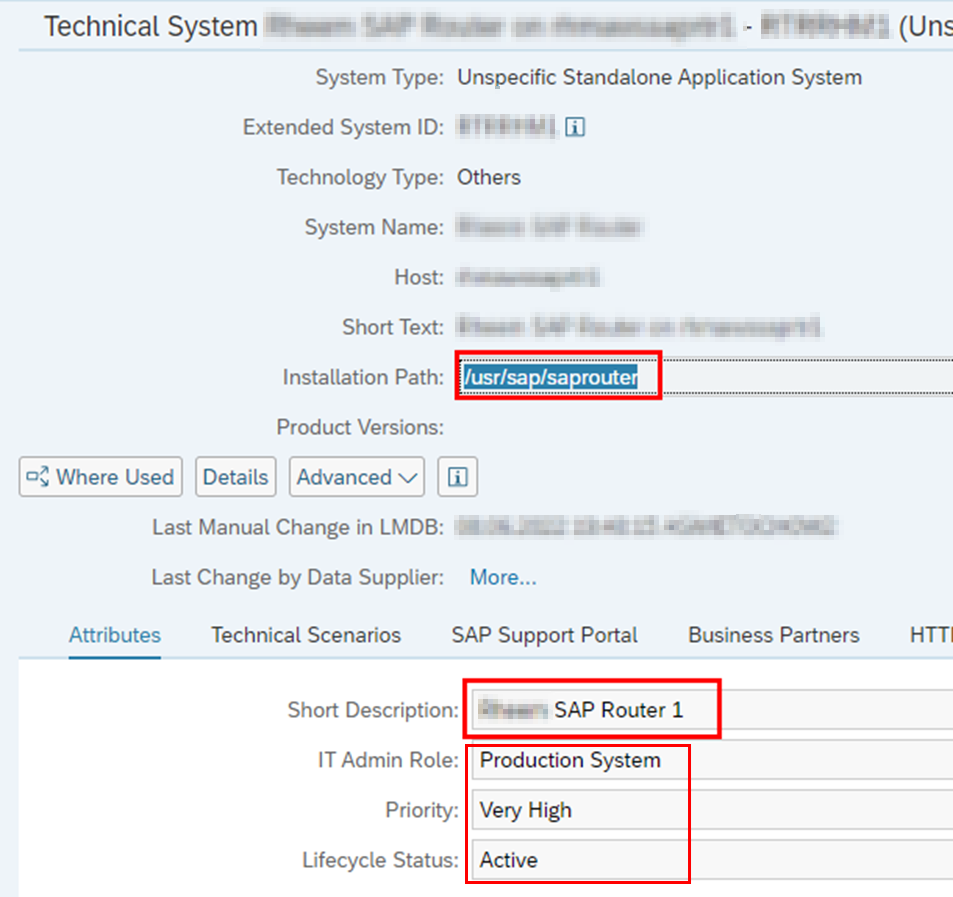
Add Installation Path and Required LMDB Attributes. NOTE: Find out the relevant software installation path of the SAPRouter on the server.
Perform Simple System Integration
Configure Script and Custom SAPHostCtrl Operation
Prerequisite: The script requires the SAPRouter SNC Certificate to be properly installed, and the PSE credentials in the cred_v2 file for the account that runs the SAPRouter service.
A script is scheduled to run daily as the same user that runs the SAPRouter service. The script reads the expiry date of the from the PSE and writes it to a file in JSON format so that the FRUN metric can read and interpret it. The script by default has SAPRouter home directory as /usr/sap/saprouter or <drive>:\usr\sap\saprouter, and it can be changed. This will be denoted as <SAPROUTER_HOME>. The PSE file variable can also be changed.
Linux/Unix
Create a new executable file in the SAPRouter home directory and copy the code in Appendix A. Ensure it is owned and executable by the user that runs the SAPRouter service and belongs to group sapsys. E.g.,
chown <saprouter user>:sapsys saprouter_expiry_days.sh
chmod 744 saprouter_expiry_days.sh
In the script, adjust the following variables:
- SAPROUTER_HOME
- SECUDIR (The SECUDIR folder is where the PSE file resides)
- SAPROUTER_USER
- PSE
Test the Script. Switch to the user that runs the SAPRouter service, then execute the script:
/usr/sap/saprouter/saprouter_expiry_days.shLook for file NUMDAYS.json. It should contain e.g.:
{type:integer, name:NumDays, value:136}Schedule script in the root crontab as follows:
# Run SAProuter SNC Certificate expiry check
00 09 * * * su - <saprouter user> -c /usr/sap/saprouter/saprouter_expiry_days.sh
Windows
Create a batch file (*.bat) in the SAPRouter home directory. In the script, adjust the following variables:
- SAPROUTER_HOME
- SECUDIR (The SECUDIR folder is where the PSE file resides)
- PSE
Test the Script. Logon as the user that runs the SAPRouter service. Right-click on the bat script and “run as Administrator”. Alternatively, if you are not logged as the SAPRouter service account, you can “run-as” the user that runs the SAPRouter service and execute the script that way.
runas /user:<domain or hostname>\<SAPRouter service user> <SAPROUTER_HOME>\saprouter_expiry_days.batNOTE: The SAPRouter service user requires “Allow log on locally” user rights.
Look for file NUMDAYS.json. It should contain e.g.:
{type:integer, name:NumDays, value:136}Schedule the Script. Open a command prompt as administrator. Execute the command:
SCHTASKS /CREATE /RU <DOMAIN>\<saprouter user> /RP <password> /SC DAILY /TN "Run SAPRouter SNC Certificate expiry check" /TR "C:\Windows\System32\cmd.exe /C \"<SAPROUTER_HOME>\saprouter_expiry_days.bat\"" /ST 09:00 /RL HIGHESTNote: The start time e.g., 09:00 is in 24 hour format. You should see:

Run the new task to test it:
SCHTASKS /RUN /TN "Run SAPRouter SNC Certificate expiry check"You should see:

Check the timestamp of the file NUMDAYS.json.
Create Custom Operation for saphostctrl
To load these values into Focused Run, a custom operation for saphostctrl needs to be created.
Linux/Unix
As Root: Create the following custom operations conf file:
/usr/sap/hostctrl/exe/operations.d/checksnccert.confEnter the following into the conf file:
Command: cat /usr/sap/saprouter/NUMDAYS.json
Description: Check number of days to SNC certificate expiry
ResultConverter: flat
Platform: Unix
Test the custom operation as follows:
/usr/sap/hostctrl/exe/saphostctrl -function ExecuteOperation -name checksnccertResult should be:
Webmethod returned successfully
Operation ID: 06C635D6863A1EEDB6BC5C819EE199D7

----- Response data ----
description=Check number of days to SNC certificate expiry
{type:integer, name:NumDays, value:169}
exitcode=0
Windows
Create the following custom operations conf file:
C:\Program Files\SAP\hostctrl\exe\operations.d\checksnccert.confEnter the following into the conf file:
Command: FOR /F "tokens=* delims=" %x in (<SAPROUTER_HOME>\NUMDAYS.json) DO @echo %x
Description: Check number of days to SNC certificate expiry
ResultConverter: flat
Platform: Windows
In a Command Prompt as Administrator, test the custom operation as follows:
"C:\Program Files\SAP\hostctrl\exe\saphostctrl" -function ExecuteOperation -name checksnccertResult should be:
Webmethod returned successfully
Operation ID: 00155D657F901EEDBCF9E32BC564F964

----- Response data ----
description=Check number of days to SNC certificate expiry
{type:integer, name:NumDays, value:360}
exitcode=0
Create Custom Alert in Focused Run
Create a new monitoring template for SAPRouter here:
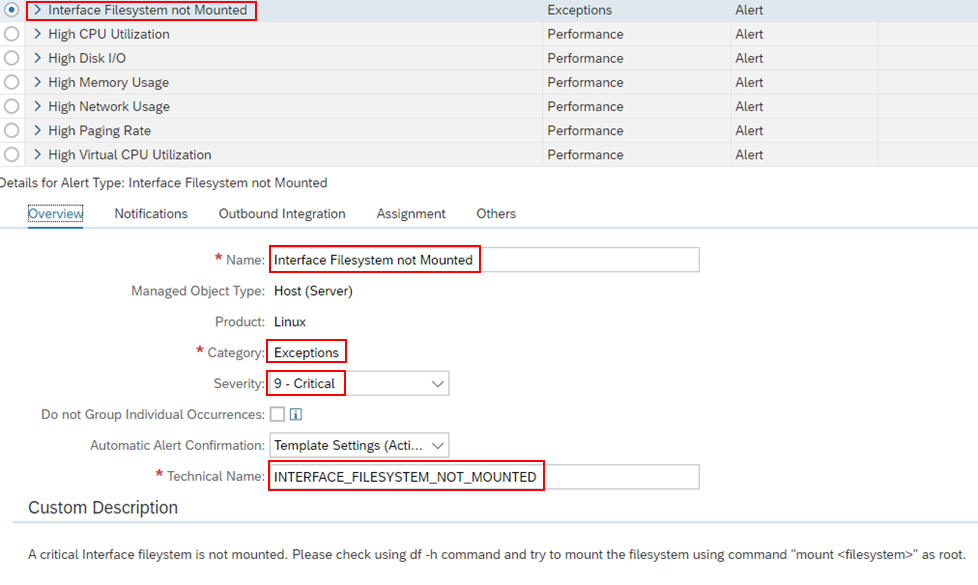
Enter into Expert Mode. Create a new Alert with the following settings:
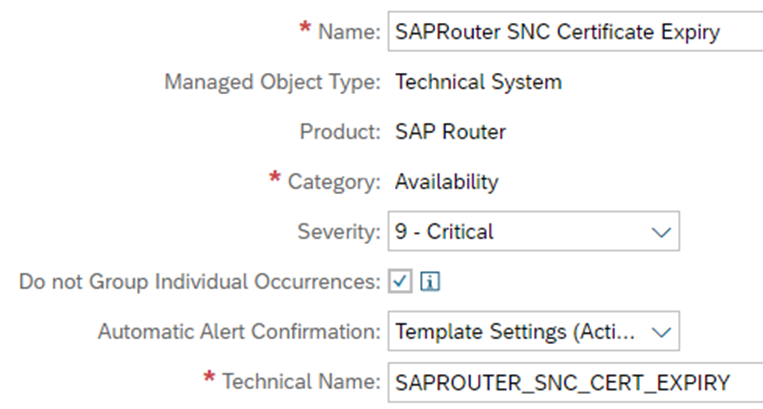
NOTE: If the tick box “Do not Group Individual Occurrences” is ticked, it will alert at each data collection regardless of its previous rating, and not only at a change of rating.
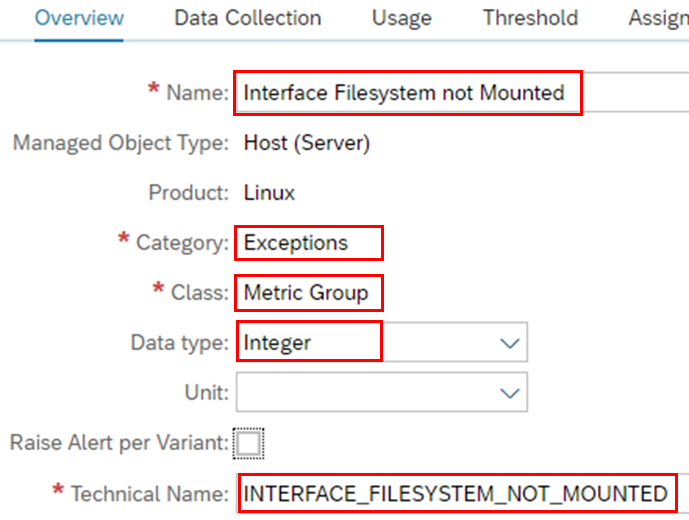
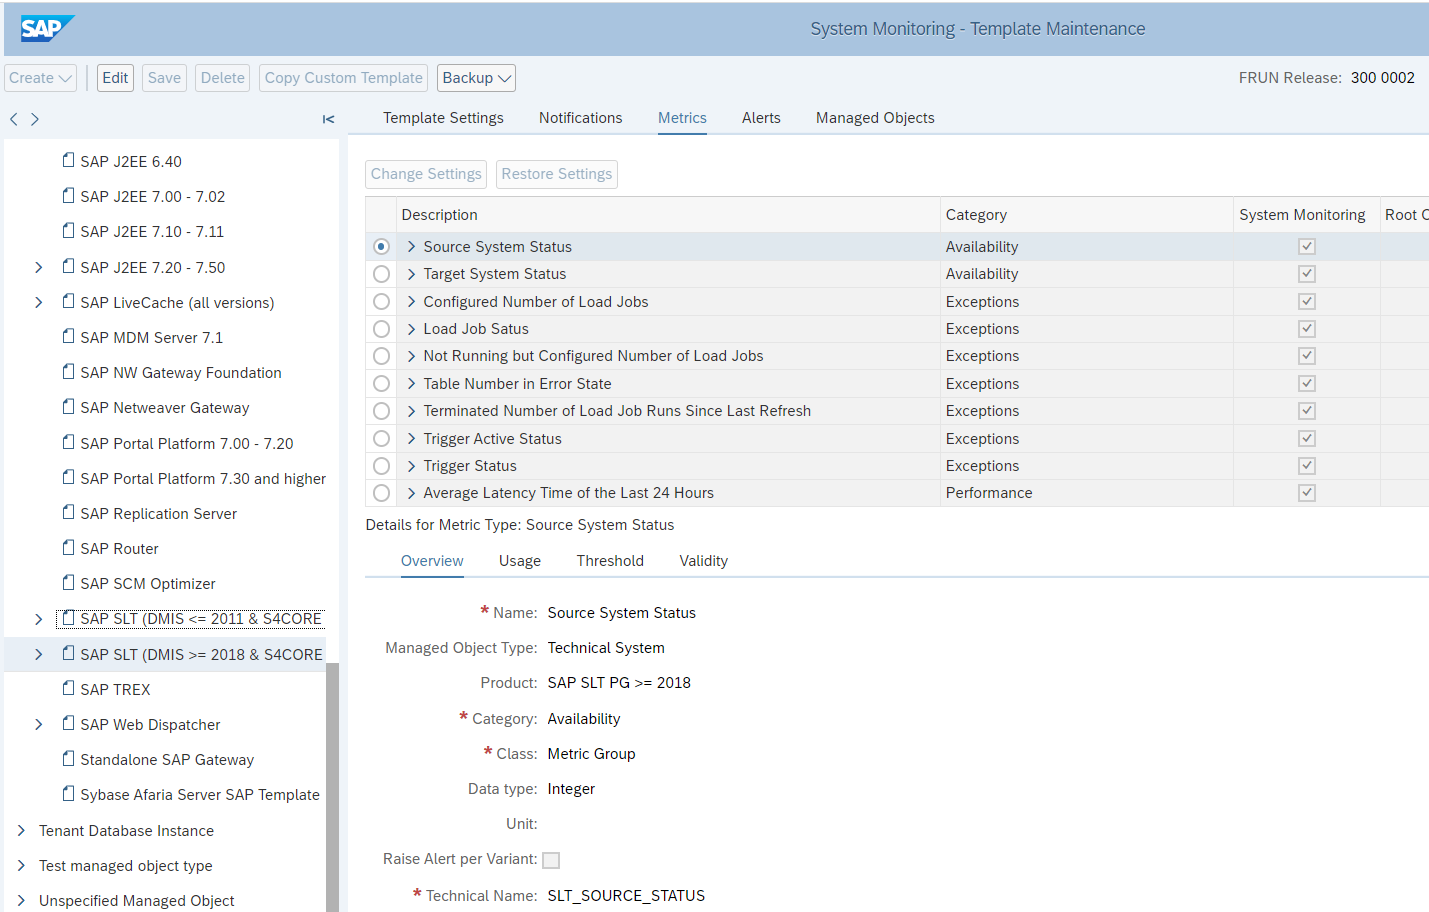
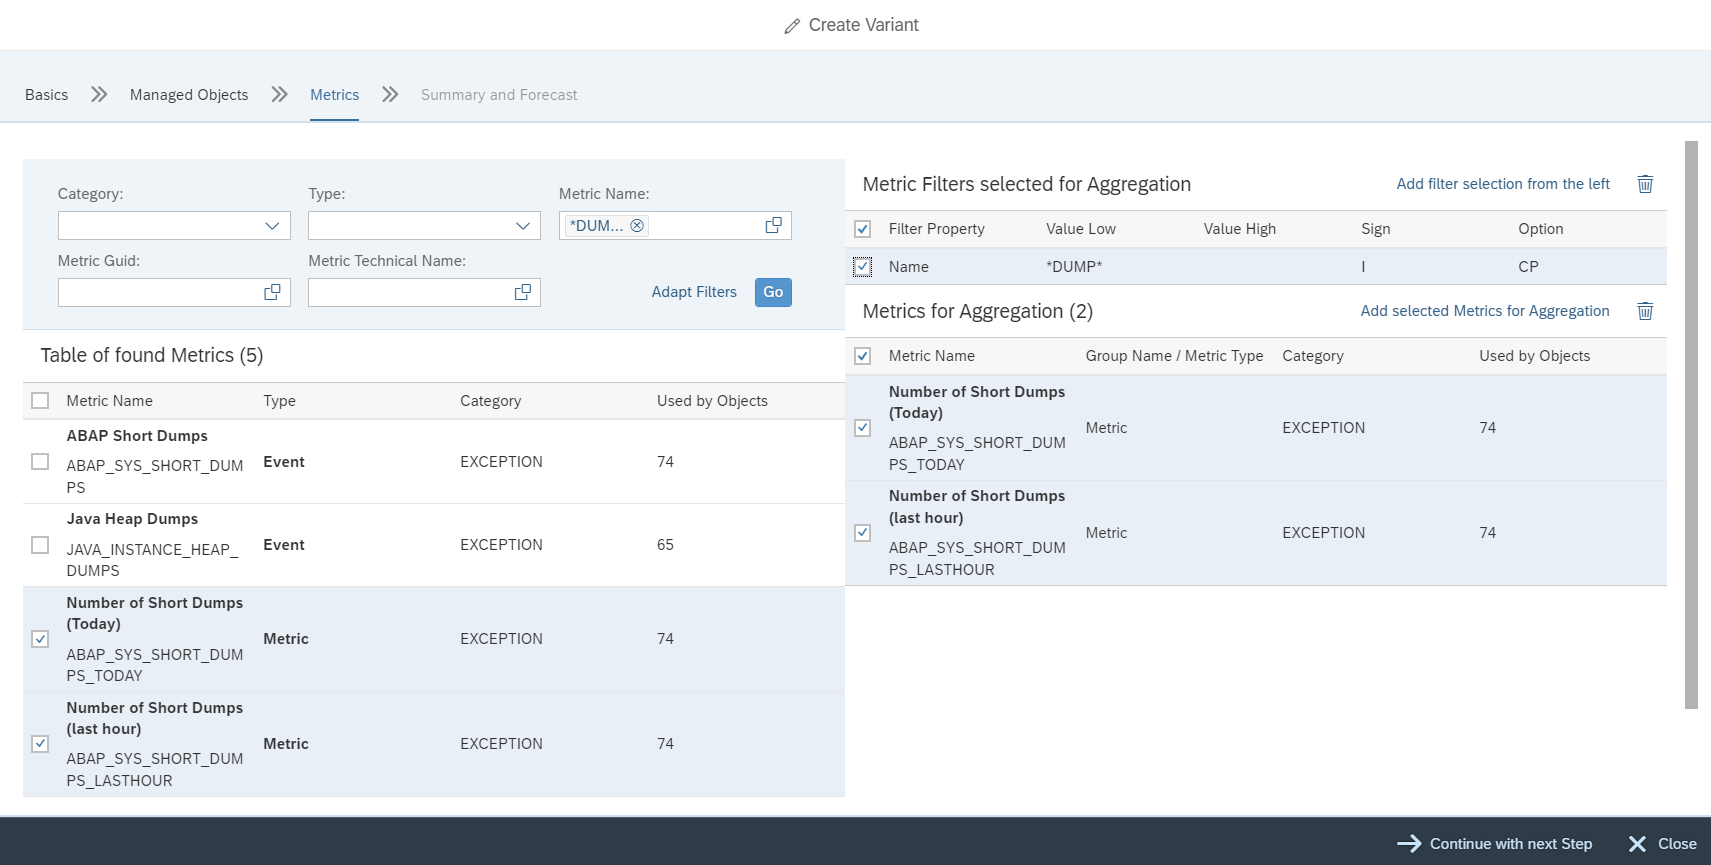
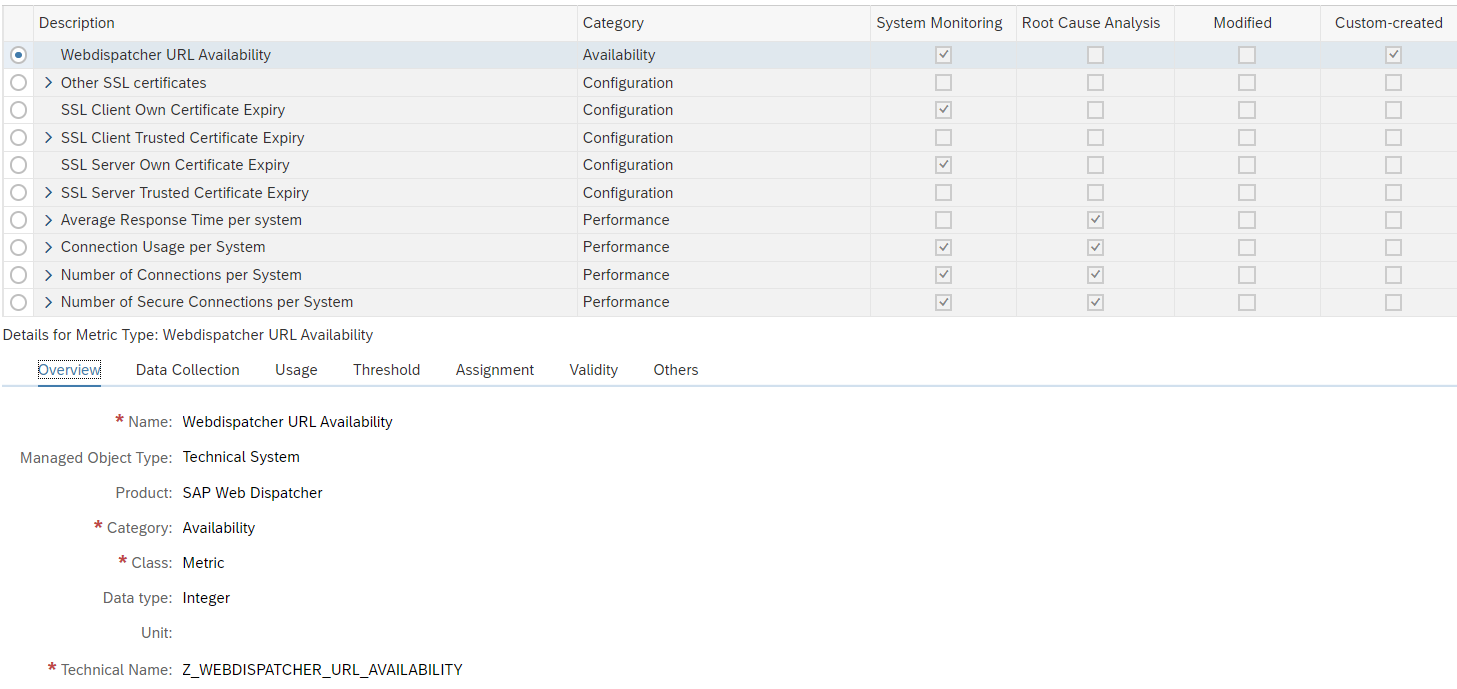
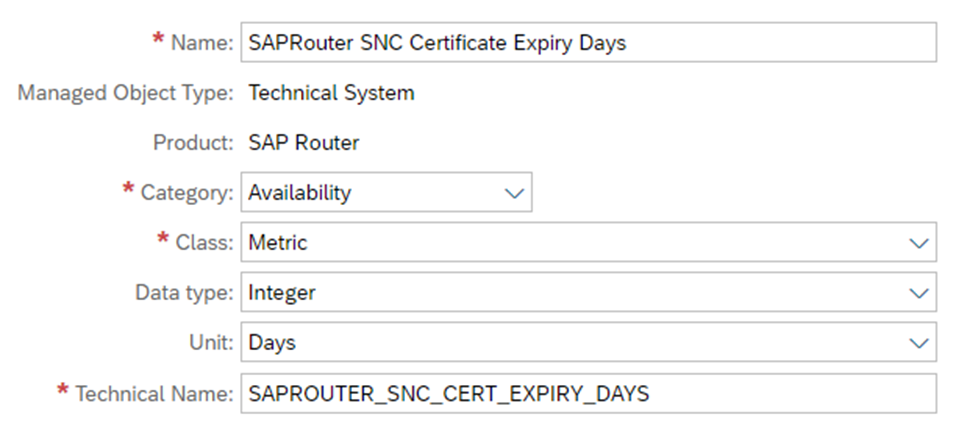
Create Custom Metric In Focused Run
Create a new Metric with the following settings:
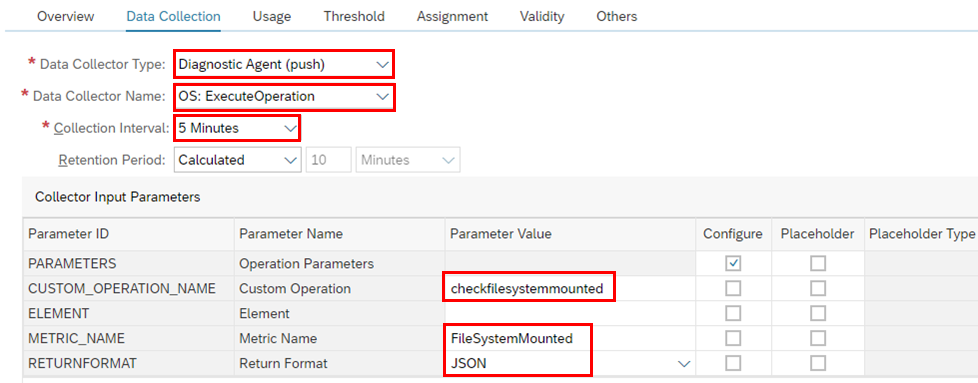
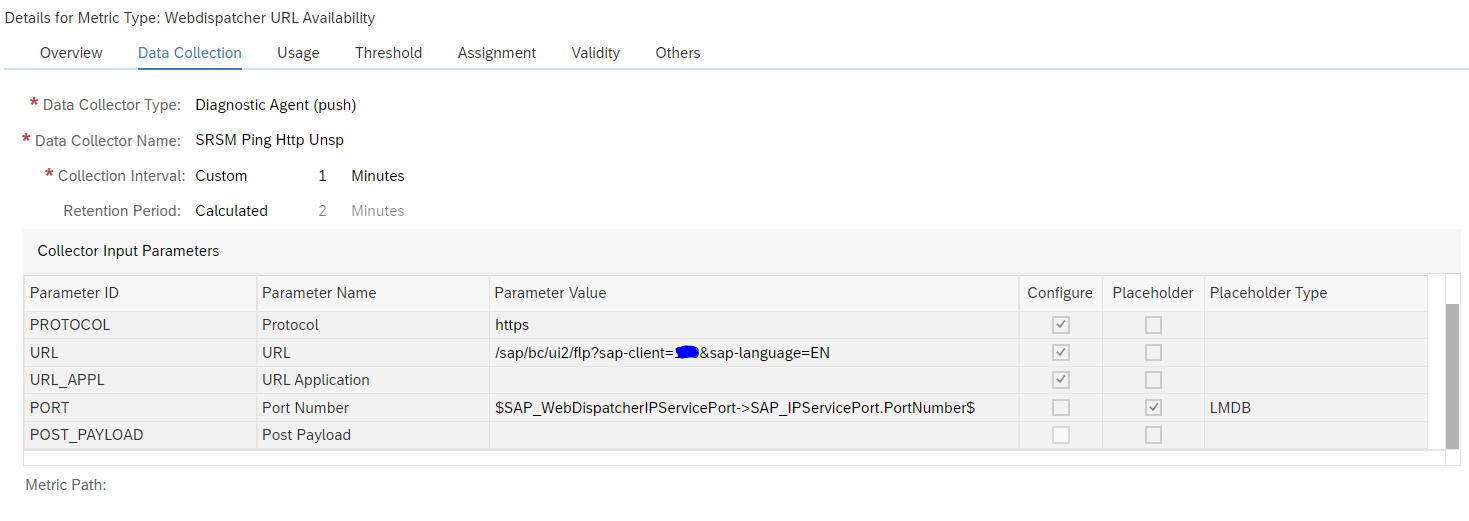
Data Collection
All parameters of the Data Collector which are fixed should have the “Configure” box unticked, and the common parameters pre-filled with the correct values.
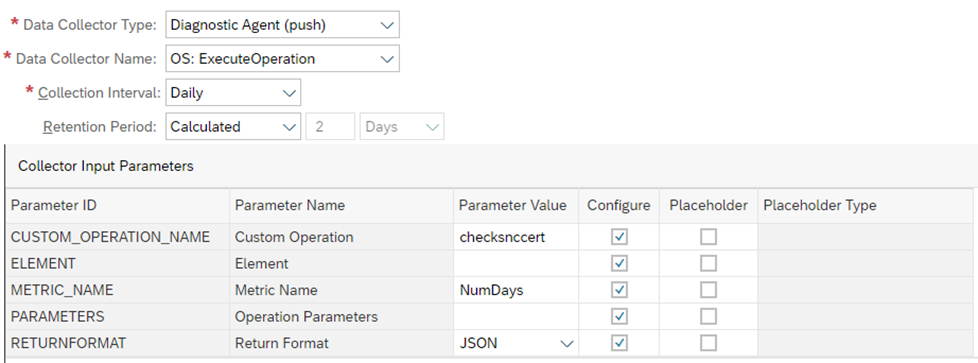
The “Custom Operation” parameter is the saphostctrl operation “checksnccert” created earlier. The “Metric Name” parameter is the name of the metric in the JSON output file produced by the script, which is “NumDays”.
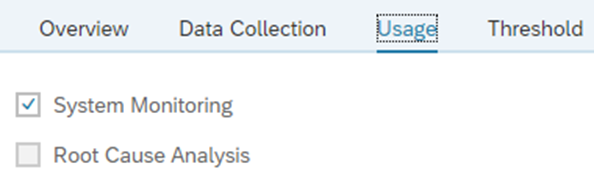
Usage
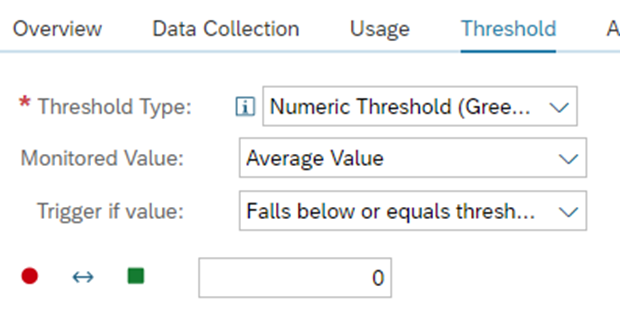
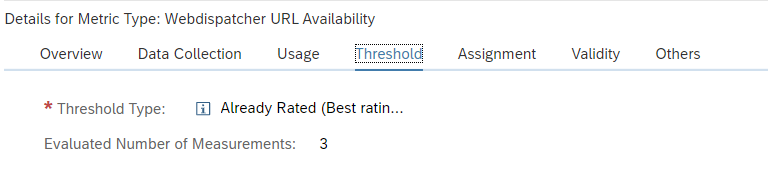
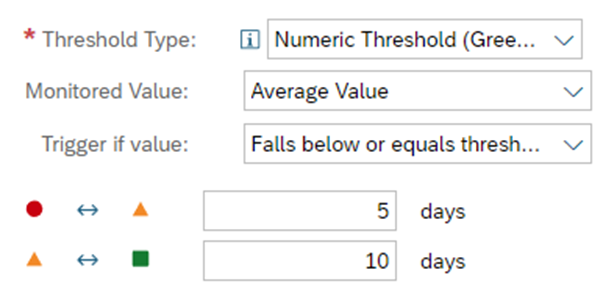
Threshold
The threshold picks up the integer as returned by the script; if it falls to below or equals 10 days, then raise a yellow alert, if below or equals 5 days, then raise a red alert. Choose whatever threshold values suit you.
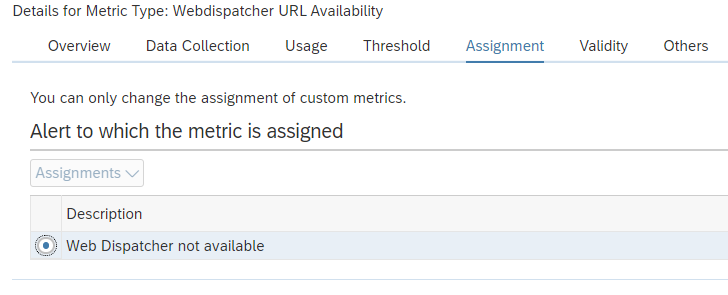
Assignment
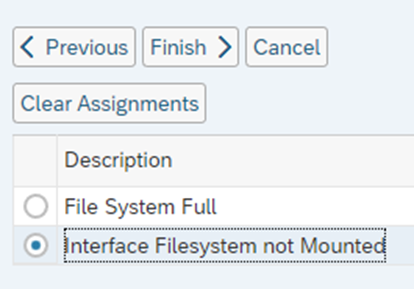
Assign the Metric to the Alert:

Activate the Alert

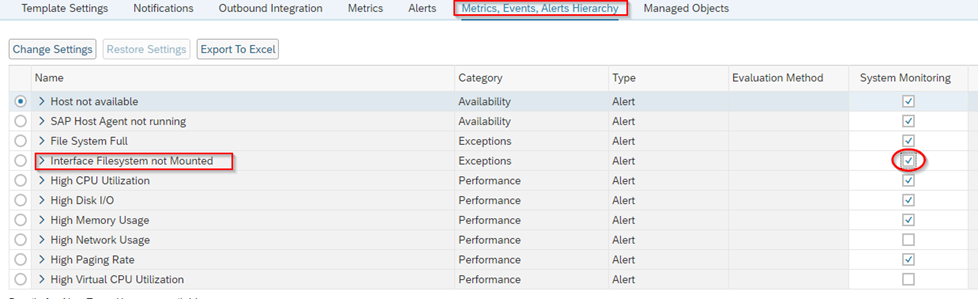
Apply SAPRouter Template and Check Monitoring
TIP: Initially set the collection interval to 5 minutes and apply template to see whether it is collecting data. Then you can set the collection interval back to daily.
You should see this in the Monitoring Application:

Appendix A: saprouter_expiry_days.sh
#!/bin/bash
# Outputs the expiry date of the SNC Certificate and calculates the number of days
# If the number of days falls below threshold, it sends an alert
# Written by Tony Swietochowski

SAPROUTER_USER=saprouter
SAPROUTER_HOME=/usr/sap/saprouter
SECUDIR=$SAPROUTER_HOME/sec
PSE=local.pse
HOSTNAME=$(hostname -f)

# Check  for saprouter user
[[ ! "$USER"=="$SAPROUTER_USER" ]] && echo "This script must be run using the $SAPROUTER_USER user. Exiting." && exit 1

EXPIRYDATE=$(${SAPROUTER_HOME}/sapgenpse get_my_name -p $PSE -n validity 2>&1 | grep NotAfter | awk -F\( '{print$2}' | cut -c -6)
NUMDAYS=$(echo $(( ($(echo $(date --date="$EXPIRYDATE" +%s) - $(date -d $(date +%y%m%d) +%s)) )/86400 )))
# Above method based on https://stackoverflow.com/questions/4946785/how-to-find-the-difference-in-days-between-two-dates

echo $NUMDAYS > $SAPROUTER_HOME/NUMDAYS
echo \{type:integer, name:NumDays, value:$NUMDAYS\} > $SAPROUTER_HOME/NUMDAYS.json
Appendix B: saprouter_expiry_days.bat
@echo off

REM Outputs the expiry date of the SNC Certificate and calculates the number of days
REM If the number of days falls below threshold, it sends an alert
REM Written by Tony Swietochowski

set SAPROUTER_HOME=D:\usr\sap\saprouter
set SECUDIR=%SAPROUTER_HOME%\sec
set SNC_LIB=%SECUDIR%\sapcrypto.dll
set PSE=local.pse

for /f "tokens=2 delims=\" %%i in ('whoami') do set THISUSER=%%i
FOR /F "tokens=* USEBACKQ" %%F IN (`hostname`) DO (SET HOSTNAME=%%F)

chdir /d %SAPROUTER_HOME%

for /f "tokens=2 delims=(" %%a in ('%SAPROUTER_HOME%\sapgenpse.exe get_my_name -p %PSE% -n validity ^2^>^&^1 ^| findstr /l "NotAfter"') do set DATESTRING=(%%a

set expiry_year=20%DATESTRING:~1,2%
set expiry_month=%DATESTRING:~3,2%
set expiry_day=%DATESTRING:~5,2%

set current_year=%date:~-4%
set current_month=%date:~4,2%
set current_day=%date:~7,2%

set "from=%current_month%-%current_day%-%current_year%"
set "to=%expiry_month%-%expiry_day%-%expiry_year%"
echo Wscript.Echo DateDiff("d", "%from%", "%to%") > %TEMP%\tmp.vbs

for /f %%a in ('cscript /nologo %TEMP%\tmp.vbs') do set /a "numdays=%%a"

del %TEMP%\tmp.vbs

echo Number of days to SAPRouter certificate expiry: %numdays% > %SAPROUTER_HOME%\NUMDAYS.log
echo {type:integer, name:NumDays, value:%numdays%} > %SAPROUTER_HOME%\NUMDAYS.json